

Keynote から PowerPoint に書き出すと図がぼける問題:その後2021/09/23(木)
以前、「Keynote '09 から PowerPoint に書き出すと図がぼける問題」というのを書きました。その後、徐々に PowerPoint への移行を進めていますが、相変わらずこの問題には悩まされています。前回書いた方法でやろうとすると、「対応する画像を探す」のが非常に大変なのです。図の数が少なければよいのですが、100個近くの図があるスライドだと、1個ずつ作業するのはかなり苦痛です。結局、Keynote と PowerPoint のファイルを両方開いて、PowerPoint 上の図を右クリックして「画像の変更…」で置き換える方が楽です。
要するに Keynote のエキスポート機能がヘボだからこういう憂き目に遭っているわけです。本当は自動化できるはずのことを、手動でやらされるのは、どうにも納得がいきません。しかも、あと少しのところなのです。Keynote と PowerPoint の図の対応が自動でつけられれば、全部自動化が可能なはずなのです。
というわけで、ちょっと頑張りました。ここからは Python ガチの話になります。
まず、numpy, opencv-python, scikit-image を入れておきます。私は "Numeric" という venv 環境を作って、そこにインストールしています。
$ python3 -m venv Numeric
$ source Numeric/bin/activate
(Numeric) $ pip3 install numpy
(Numeric) $ pip3 install opencv-python
(Numeric) $ pip3 install scikit-image
.pptx, .key ファイル名をコマンドラインから読み込んで、それぞれ一時ディレクトリに展開します。
file_pptx = sys.argv[1]
file_key = sys.argv[2]
tmpdir = os.environ['TMPDIR']
basename_pptx = os.path.basename(file_pptx)
basename_key = os.path.basename(file_key)
tmpname_pptx = tmpdir + basename_pptx + ".folder"
tmpname_key = tmpdir + basename_key + ".folder"
subprocess.run(["rm", "-rf", tmpname_pptx])
subprocess.run(["rm", "-rf", tmpname_key])
os.makedirs(tmpname_pptx)
os.makedirs(tmpname_key)
shutil.copy(file_pptx, tmpname_pptx + os.sep + basename_pptx)
shutil.copy(file_key, tmpname_key + os.sep + basename_key)
subprocess.run(["sh", "-c", "cd \"" + tmpname_pptx + "\"; unzip " + basename_pptx], stdout=subprocess.PIPE)
subprocess.run(["sh", "-c", "cd \"" + tmpname_key + "\"; unzip " + basename_key], stdout=subprocess.PIPE)
画像ファイルの一覧を取得します。".pdf" から ".png" への変換が問題なので、その組み合わせだけです。
list_pptx = glob.glob(tmpname_pptx + "/ppt/media/*.png")
list_key = glob.glob(tmpname_key + "/*.pdf")
base_pptx = [os.path.basename(n) for n in list_pptx]  #  表示用のベースネーム
base_key = [os.path.basename(n) for n in list_key]
画像ファイルのサイズを取得します。ここは ImageMagick の identify コマンドを使っています。ImageMagick は、自力でビルドするのは非常に大変なので、Homebrew でインストールしました。
size_pptx = []
size_key = []
for i in range(len(list_pptx)):
  res = subprocess.run(["identify", "-format", "%[width],%[height]", list_pptx[i]], stdout=subprocess.PIPE)
  sizelist = [int(x) for x in res.stdout.decode('utf-8').split(",")]
  size_pptx.append(sizelist)
for i in range(len(list_key)):
  res = subprocess.run(["identify", "-format", "%[width],%[height]", list_key[i]], stdout=subprocess.PIPE)
  sizelist = [int(x) for x in res.stdout.decode('utf-8').split(",")]
  size_key.append(sizelist)
サイズが似ているもの(差が1ピクセル以内)の組み合わせを探します。
original_pptx = [[] for i in range(len(size_pptx))]
converted_key = [[] for i in range(len(size_key))]
for i in range(len(size_pptx)):
  for j in range(len(size_key)):
    if abs(size_pptx[i][0] - size_key[j][0]) < 2 and abs(size_pptx[i][1] - size_key[j][1]) < 2:
      original_pptx[i].append(j)
      converted_key[j].append(i)
さあここからが本番です。画像の類似性判定について、いろいろ調べたのですが、skimage.metrics の structural_similarity が一番うまくいきました。画像の読み込みに OpenCV, データの処理に NumPy を使うので、これらを使えるようにしておきます。(他にも import はいろいろ必要ですが、省略しています)
import cv2
import numpy as np
from skimage.metrics import structural_similarity
類似性判定です。まず pdf を ImageMagick の convert コマンドで png に変換したあと、サイズを合わせます。私が使う画像は線画が多いので、あまりエッジが鋭いと判定がうまくいかないかもしれません。そこで、cv2.blur で少しぼかします。そのあと、structural_similarity で類似性を判定し、一致度が最大のものを選びます。
for i in range(len(original_pptx)):
  if len(original_pptx[i]) > 1:
    #  pptx の画像を読み込む
    image1 = cv2.imread(list_pptx[i], -1)
    if image1.shape[2] == 4:
      #  アルファチャンネルを統合
      alpha = image1[...,-1:].astype("float32") / 255
      image1 = image1[...,:-1] * alpha + 255 * (1 - alpha)
      image1 = image1.clip(0, 255).astype("uint8")
    img_size = (image1.shape[1], image1.shape[0])  #  shape[1]が幅、shape[0]が高さ
    #  ぼかす
    image1 = cv2.blur(image1, (3, 3))
    simmax = None
    jmax = None
    for j in range(len(original_pptx[i])):
      #  original_pptx[i][j] の画像を png に変換する(変換済みならそれを使う)
      original_png = re.sub(r'\.pdf$', '.png', list_key[original_pptx[i][j]])
      if not os.path.exists(original_png):
        res = subprocess.run(["convert", list_key[original_pptx[i][j]], "-define", "png:color-type=2", original_png])
      #  変換した画像を読み込む
      image2 = cv2.imread(original_png)
      if image2.shape[1] != img_size[0] or image2.shape[0] != img_size[1]:
        #  いったん2倍にリサイズしてから、先ほどと同じサイズにする
        image2 = cv2.resize(image2, (img_size[0]*2, img_size[1]*2))
        image2 = cv2.resize(image2, img_size)
      #  ぼかす
      image2 = cv2.blur(image2, (3, 3))
      sim = structural_similarity(image1, image2, multichannel=True)
      print("comparing {} and {}; sim = {}".format(base_pptx[i], base_key[original_pptx[i][j]], sim))
      if simmax == None or simmax < sim:
        simmax = sim
        jmax = j
    #  一致度が最大のものを選ぶ
    print("{} is selected".format(base_key[original_pptx[i][jmax]]))
    original_pptx[i] = [original_pptx[i][jmax]]
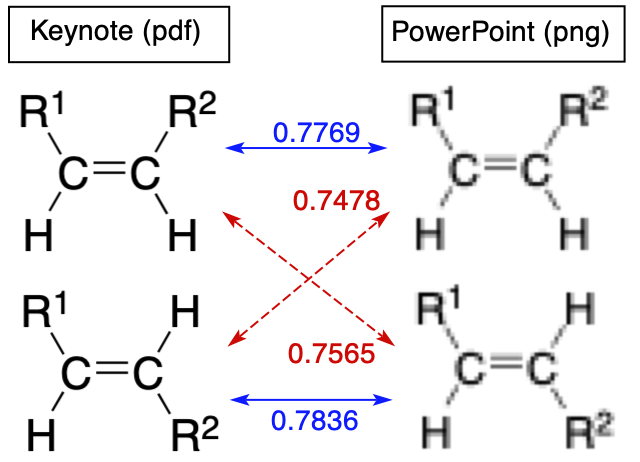
実験してみました。下の画像の類似性判定で、一致度が図のようになっています。なかなかのものです。この2つの画像が区別できるんだったら、大丈夫でしょう。
あとは、少し解像度高めの画像を convert で作成して、差し替えて、PowerPoint フォーマットに戻せばできあがりです。
#  png ファイルを入れ替える
for i in range(len(original_pptx)):
  if len(original_pptx[i]) > 0:
    res = subprocess.run(["convert", "-density", "288", list_key[original_pptx[i][0]], "-define", "png:color-type=6", list_pptx[i]])

#  新しい pptx ファイルを作成する
basename_fixed = re.sub(r'\.pptx', '_fixed.pptx', basename_pptx)
file_fixed = re.sub(r'\.pptx', '_fixed.pptx', file_pptx)
subprocess.run(["sh", "-c", "cd \"" + tmpname_pptx + "\"; zip -r \"" + basename_fixed + "\" '[Content_Types].xml' docProps ppt _rels"], stdout=subprocess.PIPE)

subprocess.run(["mv", "-f", tmpname_pptx + "/" + basename_fixed, file_fixed])
print("Fixed file {} was successfully created.".format(file_fixed))
実運用を始めるといろいろ問題が出てきそうな気がしますが、その都度対応していこうと思います。